

Applies to app version 2023.02 with the following features added in the next releases:
- 2024.01 Default cost codes
- 2024.02 Tags for booking records
- 2024.02 Raise a Task button
- 2024.02 Adjust Filter button to edit a booking with new search criteria
- 2025.02 API.Bookings.UnlimitedCapacity permission to override the space capacity limitation
With Schedule View, you can now make informed decisions when managing meeting room bookings within your organisation.
✅ From the Schedule View, you can:
- Create a new booking in available slots.
- Select an existing booking to edit or cancel it.
- Amend existing booking data by clicking the booking without interrupting the management workflow.
- Swap bookings to a different host or similar room, allowing for reallocation and modification of user bookings.
- Create a new meeting by selecting the whole needed time range. For this, refer to the procedure of creating a new booking that is described below.
- Move meetings by dragging and dropping them across the table. For this, refer to the procedure of editing an existing booking that is described below.
- Copy and paste a meeting. Open an existing meeting and create a new one with the same details instead.
👋 Share your feedback with us about this documentation. Highlight a word or a whole paragraph and click the plus icon that appears. We keep improving this knowledge base based on your comments.
Note: This view is available for bookings of meeting rooms as the workspace type only.
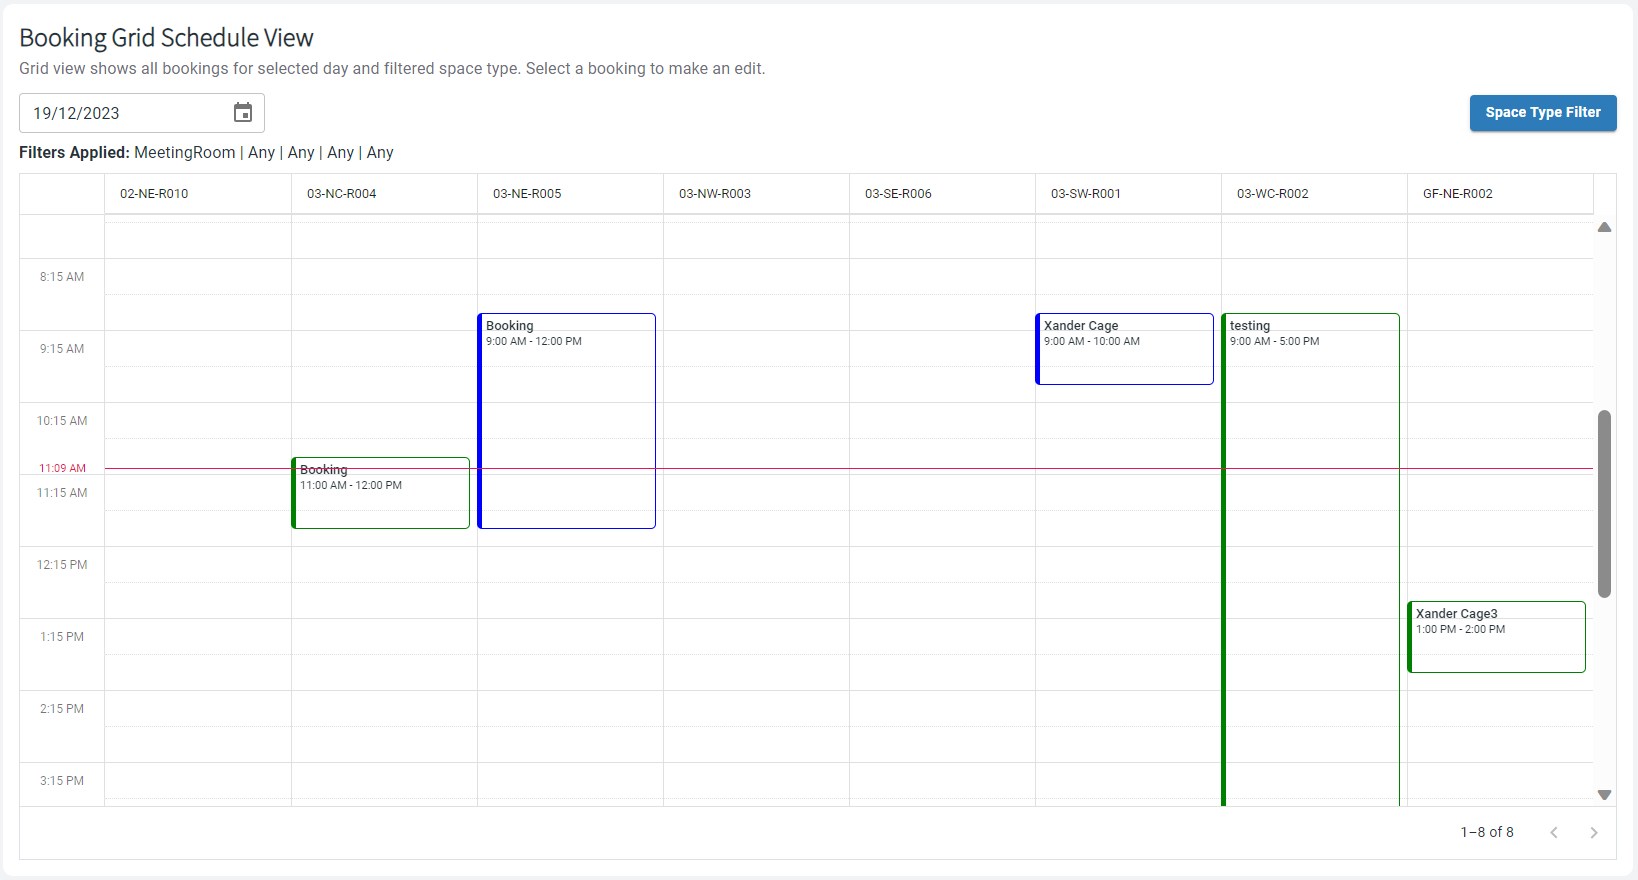
The bookings that you see can have different statuses with the following colour codes:
- Grey outlined – meetings that have already happened
- Grey filled – cancelled or autocancelled bookings
- Blue – no show
- Yellow – in progress
- Green – booked and approved
- Red – pending approval
- Black – everything else
Depending on the date selected at the top left and the applied Space Type Filter options, you will see a set of meeting rooms in columns: their availability and corresponding existing bookings that match the criteria.
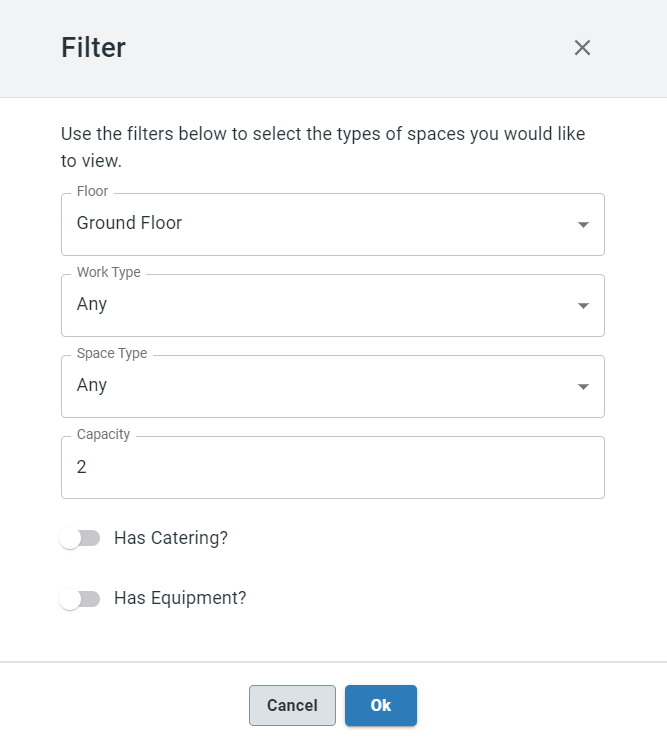
Use the filter to view meeting rooms with the following criteria:
- Floor. Select a floor where you want to search for a space.
- Work Type
- Space Type
- Capacity. Indicate how many people you are expecting to participate.
⚠️ The logic behind this: You will receive search results with spaces which capacity is greater than this number that you've searched for. For example, if you have entered “1” in the Capacity filed, the system is looking for spaces with a capacity greater than 1 and not equal to one. This is to ensure that common spaces with low capacity (for example, desks) are not returned in the Schedule View to avoid performance issues.
⚠️ Users with the API.Bookings.UnlimitedCapacity permission can override the space capacity. It means that they can add more attendees to the booking beyond the capacity value. A corresponding warning message will prompt users to use this permission carefully.
- Has Catering? If set up by the corresponding booking policy and there is sufficient time before the cut-off time.
- Has Equipment? Use this option if you need to filter meeting rooms with certain equipment.
If nothing is selected in the filter, the table shows bookings for today, on your preferred floor that is set in User Preferences, in any zone.
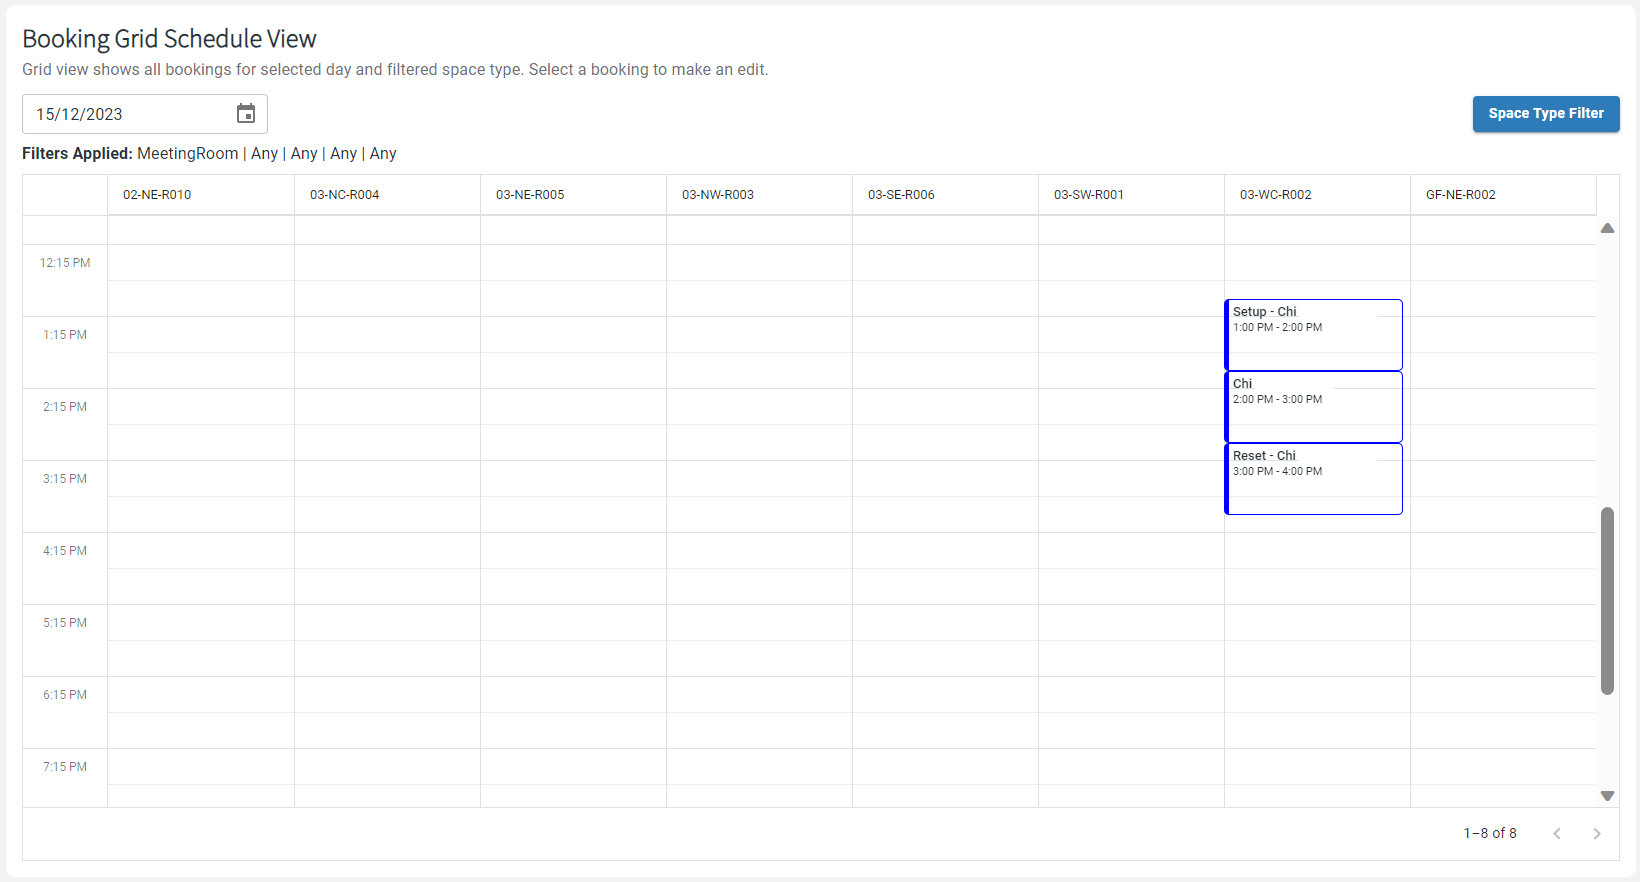
Linked spaces bookings
For the bookings of linked spaces, you will see three booking slots: the actual meeting and two accompanying bookings before and after it to accommodate for setup and reset time.
Note: The host of such meeting sees just their space booking in the middle.
Creating a new booking from Schedule View
To create a new booking, do the following:
- In the column of the needed meeting room, select the time block of 30 mins and click +.
- The Create a booking side panel opens on the right where you enter booking details and select from the available options.
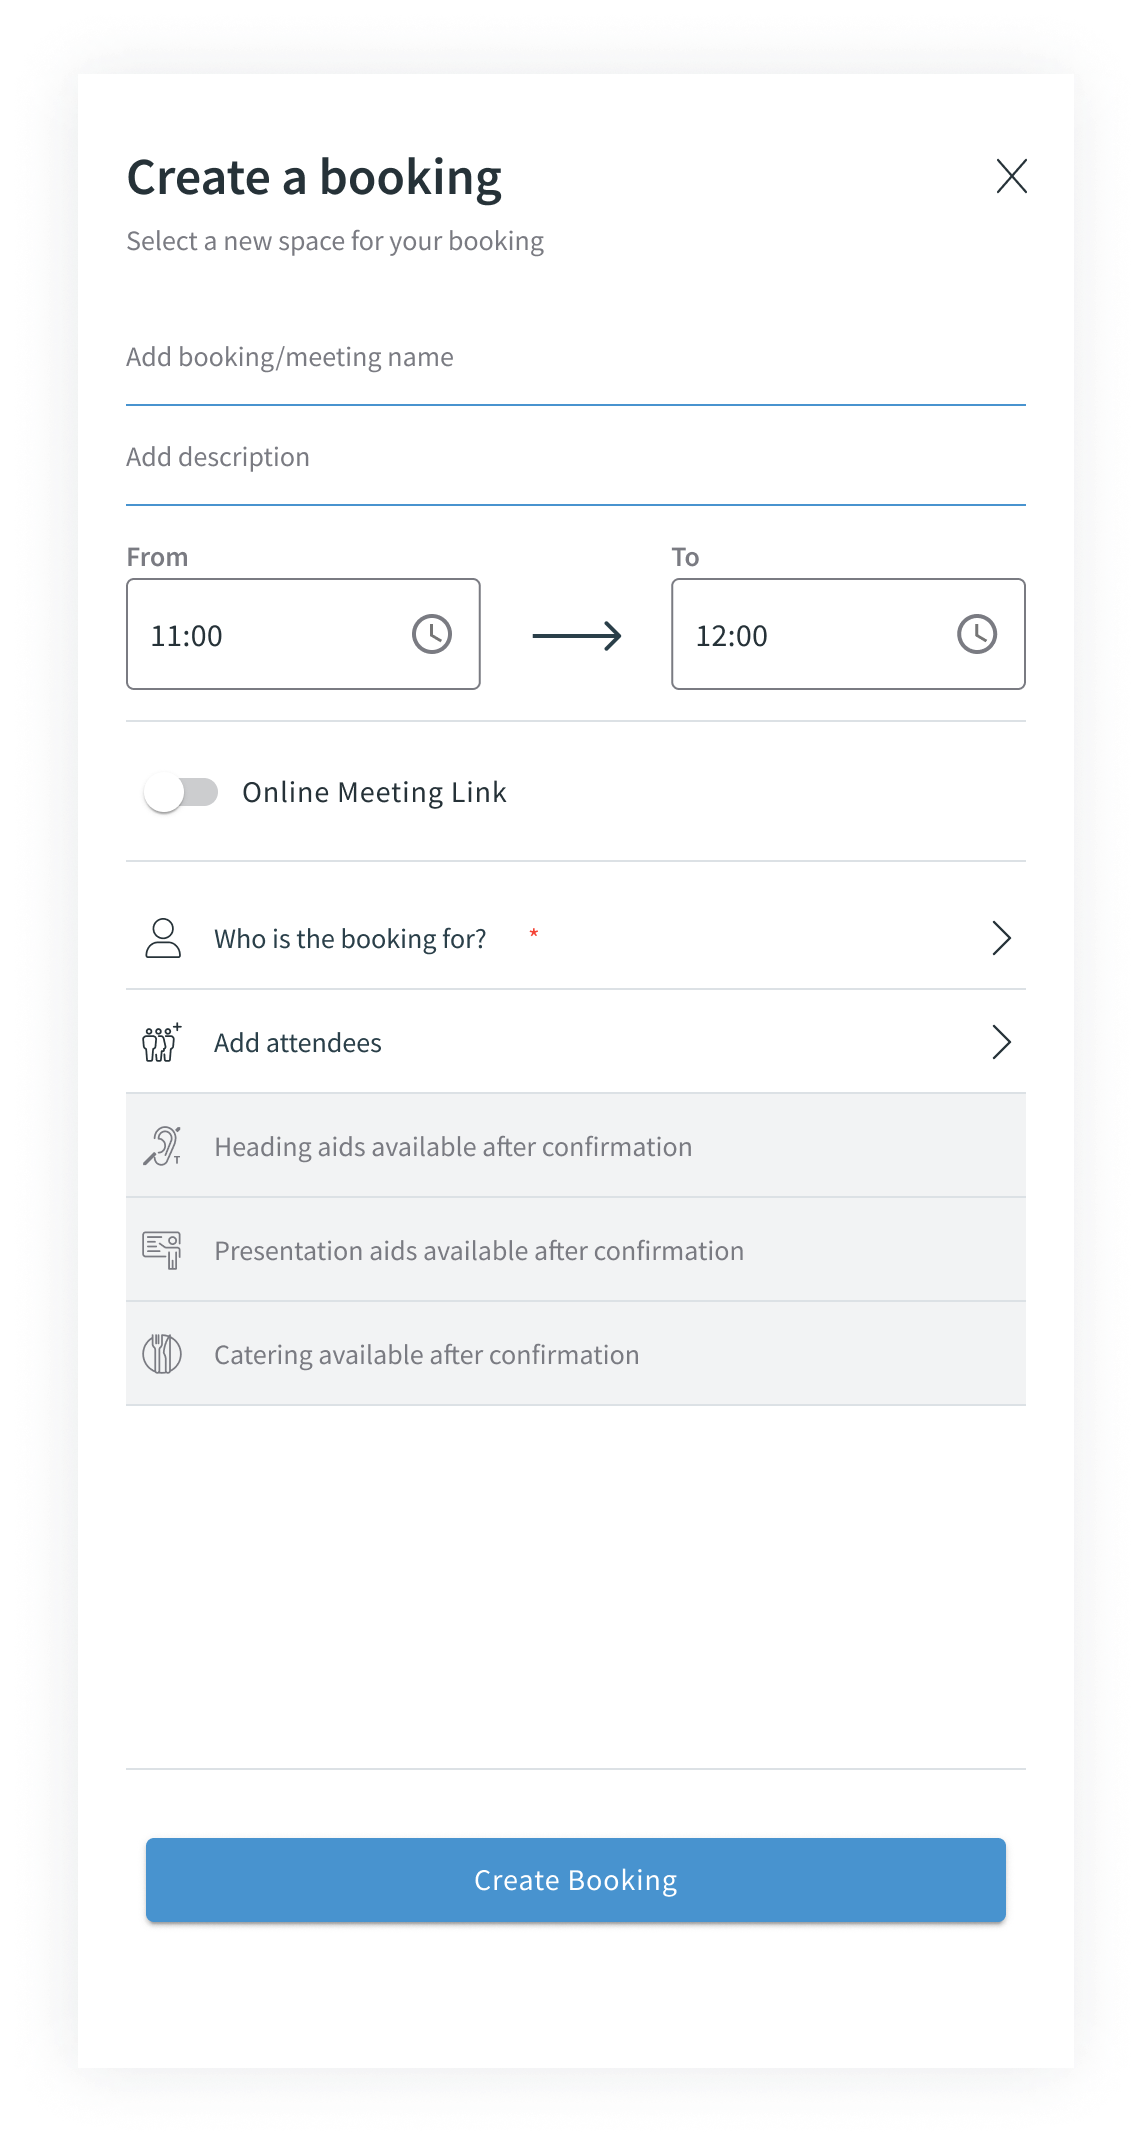
- Add a name (recommended).
- Add description (recommended).
- Edit the time range if needed.
- Select whether Online Meeting Link should be created.
- Select the host for the meeting if you are creating this booking on behalf of someone else.
⚠️ If you don't indicate anyone, you are the host. - Add attendees from your organisation or visitors if any.
- Confirm by clicking Create Booking.
Editing an existing booking in Schedule View
You can edit upcoming meetings but not past ones. For ongoing meetings, you can modify details but cannot change the host or space.
Editing an existing booking in Schedule View has the following options and hence different actions that need to be taken:
- To change host of the booking.
- To swap spaces to accommodate for changed meeting attendees number or to optimise space usage.
- To swap meeting time.
Changing the host
To change the host of the booking, do the following:
- Click the booking that you see on the Schedule View page. The booking details page opens.

- Click Edit next to the host name. A popup opens.
- Define who you want to change the host to: an employee of your organisation or a visitor.
- For an employee, enter name or email address.

Select if you want to check in this employee.
Select if you want to use cost codes associated to this employee. - For a visitor, click the Visitor button and enter all necessary details to create a proper visitor record.

Select if you want to check in this visitor.
- For an employee, enter name or email address.
- Click Save to change the host. New host will receive a corresponding notification about this booking.
Swapping spaces for a booking
To swap a space for a booking in Schedule View, do the following:
- Click the booking that you see on the Schedule View page. The booking details page opens.
- Click Edit next to the space name.

- Now, you have two options:
- Select a new similar space using the initial criteria.
- Click Adjust Filters and search for a space with different criteria, for example, with different needed capacity for the space.
- Confirm Space Swap.
- The host, attendees, and visitors are then informed in an email.
Note: If a certain meeting room is not listed as an option, this means that the room has another meeting at the same time.
To swap spaces of two meetings that are scheduled for the same time, do the following:
- Move one of the meetings in time beyond the needed time slot.
- Move the second meeting to the space of the first one.
- Move the first meeting to the second space and correct time.
Note: If you are an Admin user with rights to ignore booking policies and are changing an existing booking for a host with limited role permissions (no rights to ignore booking policies) from location A to location B, you will only be able to move that booking to spaces that the host has the rights to use.
Swapping date or time for a booking
Changing time and date of the booking can be made in one go.
- Click the booking that you see on the Schedule View page. The booking details page opens.
- Click Edit either next to the date or time of the booking.

- Make needed changes to the date and/or time of the booking.
- Click Search to make sure that either the current space is available for the changed time or to see what other options the system will offer.
- Here, you have two options:
- Select the space that is available for your changed time.
- Select a different search criteria for the space to swap it here too.
- Click Swap space to confirm.
Cancelling an existing booking in Schedule View
If you have the corresponding rights for your role, you can cancel booking of another user. To cancel a booking, do the following:
- Open a booking from Booking List or Schedule View.
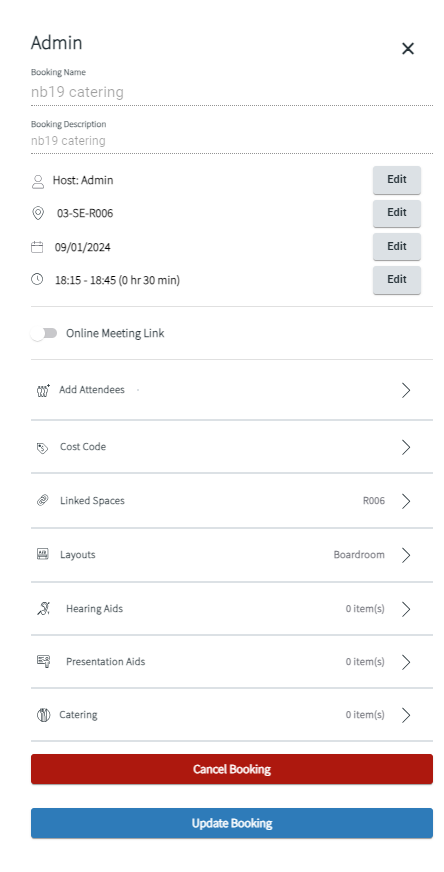
- Click the red Cancel Booking button.
- Confirm your decision when prompted.

Now, the booking is cancelled but still present on the Schedule View page filled with grey colour to mark cancelled bookings.