

Applies to app version 2023.02 with the following features added in the next releases:
- 2024.01 Default cost codes
- 2024.02 Tags for booking records
- 2024.02 New look of the Advanced Bookings page
👋 Share your feedback with us about this documentation. Highlight a word or a whole paragraph and click the plus icon that appears. We keep improving this knowledge base based on your comments.
For a special meeting you might need a certain large space that is set up with a certain layout of furniture, for example in a square hole, auditorium, or classroom. Your organisation can have adjacent bookable spaces that can be combined into one on request.
⚠️ Linked spaces work with the space type of meeting rooms only.
⚠️ Linked spaces require time to set them up for your meeting and time to reset them to their original state. Each organisation defines the needed amount of time for these activities in booking policies. That's why during booking of linked spaces, you will have an additional step meant for validation of available slots before and after your meeting for setup and reset activities in the requested spaces.
You can book linked spaces on the Simple Booking page and on the Advanced Booking page.
Booking linked spaces on the Simple Booking page
To book a linked space when creating a single booking, do the following:
- On the Simple Booking page, click Edit search criteria to start looking for linked spaces.
- Select the needed type of a meeting room for the Space type because only meeting rooms can be linked.
- Turn the Need a linked space? toggle on. The Need layouts? toggle turns on automatically too.
- Click UPDATE to search for linked spaces specifically.
- Select a space.
- On the booking details page, under Linked Spaces, select the combination of spaces that you want to use and select the layout. Save your selection.
Note: Mind that the other space that is linked to the one that you initially selected might not be available at the time of your meeting. In that case, you will receive a corresponding error message and will have to search for other appropriate two spaces that can be linked again. - (optional) Indicate if you Book for Someone Else: an employee or a visitor. For employee, you can select the checkbox to use their default cost codes if they have set any.
- (optional) Add Attendees if applicable.
- Indicate one or more Cost Codes if your organisation is using them:
- Add cost codes in free text or by selecting them from a list.
- Edit the default ones if you are booking for yourself. Read the Default Cost Codes section in this article: Settings in Flex.
- Check the cost codes of the person that you book for if you selected to use their default cost codes in the previous step.
- Click Confirm booking. At this point, as with booking other spaces, you can add equipment, catering, or tags if available for this space.
Booking linked spaces on the Advanced Booking page (preferred method)
To book a linked space for now or later, do the following:
- On the Advanced Booking page in Flex, select all search criteria for you event that requires booking linked spaces.
- Click Show more search options.
- Turn on the Linked Spaces toggle.

- Select a space in the search results column.
Check its booking policy, additional space information, and relevant space guides if available.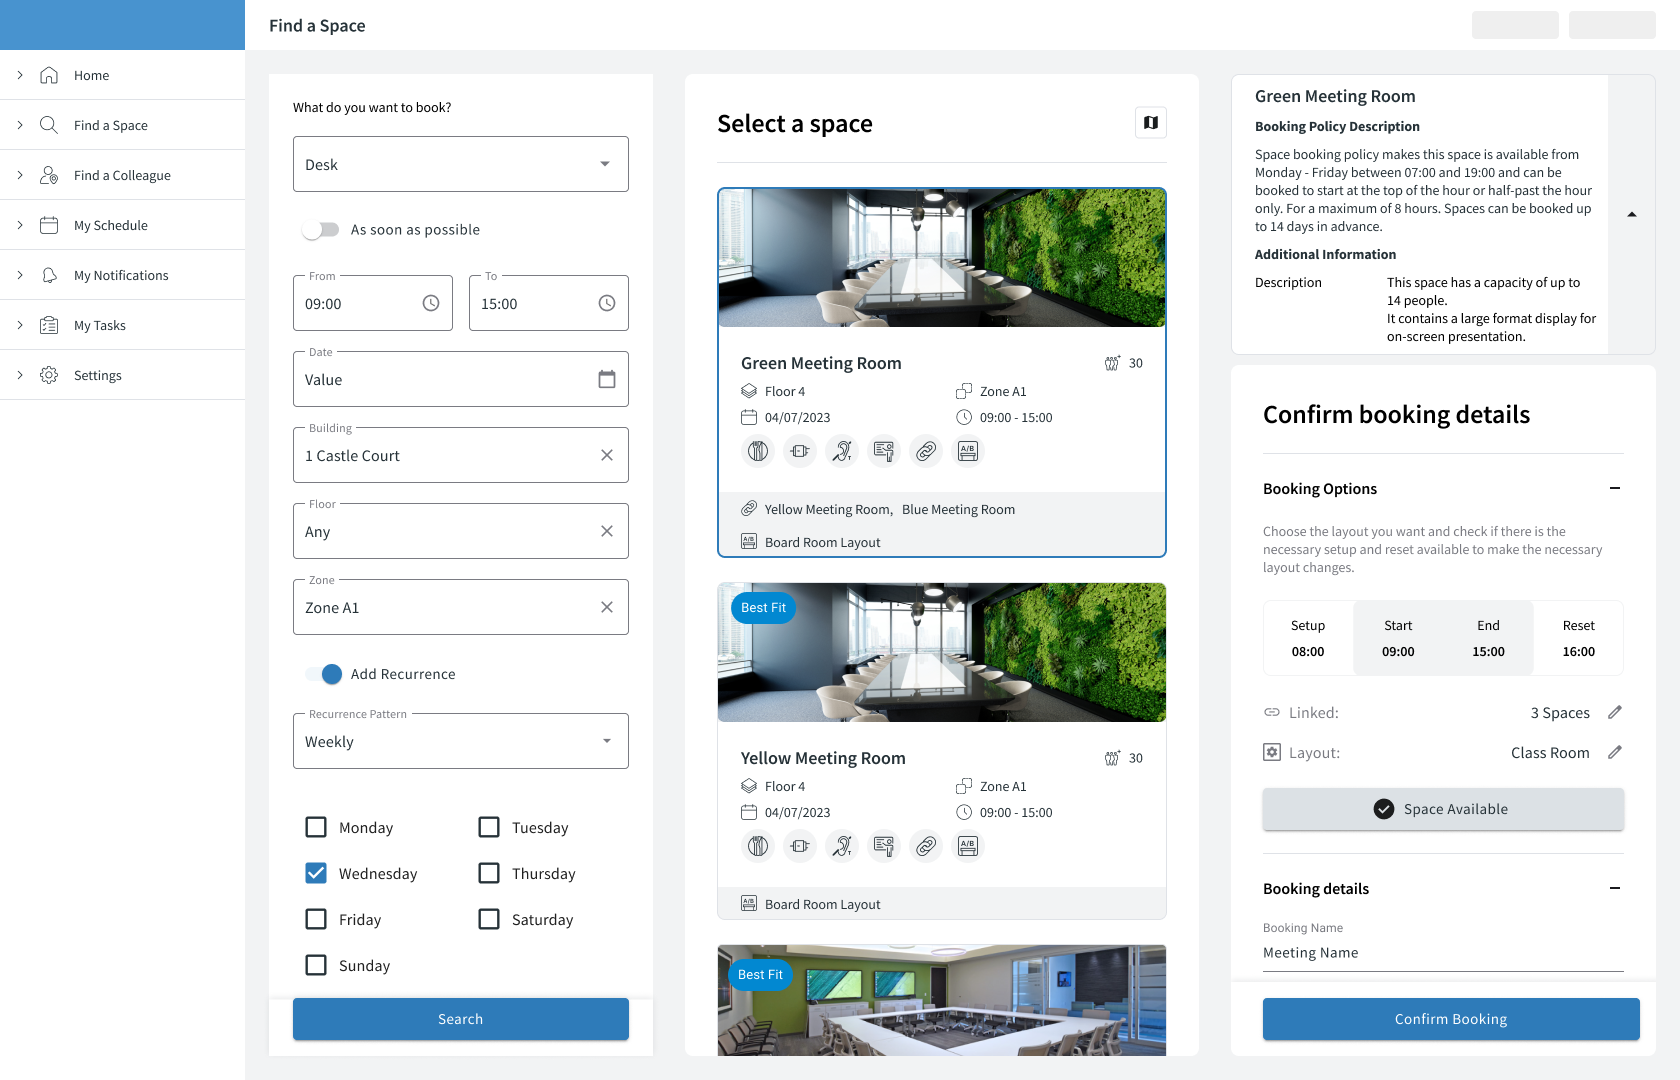
- You will see the booking details in the third column of the page.

Read more about the additional setup and reset slots that are added before and after your booking: Setup and reset slots for linked space bookings. - Click Linked Spaces: to view the options for these spaces. Select the most appropriate layout for your needs.

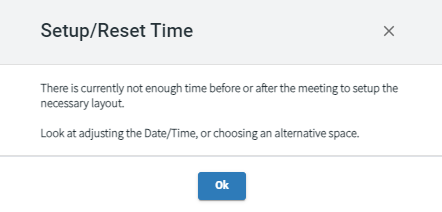
- Click Save in the popup to move on to check whether there's sufficient setup and reset time to prepare selected linked spaces for your desired time of the meeting.
- Click Check availability to see whether all conditions are met.
- If the space is available for booking, add the booking name and other details including cost codes and other options.

- (optional) Indicate if you Book for Someone Else: an employee or a visitor. For employee, you can select the checkbox to use their default cost codes if they have set any.
- (optional) Add Attendees if applicable.
- (optional) Indicate one or more Cost Codes if your organisation is using them:
- Add cost codes in free text or by selecting them from a list.
- Edit the default ones if you are booking for yourself. Read the Default Cost Codes section in this article: Settings in Flex.
- Check the cost codes of the person that you book for if you selected to use their default cost codes in the previous step.
- If the space is not available, you will see the corresponding message and will return to selecting another space or another layout for your booking.
- Click Confirm booking to save your booking of linked spaces.
Now, you will see your booking on the Schedule page. The team that is responsible for setting up and resetting linked spaces will receive a corresponding notification and will have booked time slots before and after your meeting to set things up and clean it up for you.