

Applies to app version 2023.01 with the following features added in the next releases:
- 2024.01 Default cost codes
- 2024.02:
- Updated look of the page
- Tags for booking records
- Multiple bookings
- 2024.03:
- The Who are you booking for? field to support booking as a delegate or on behalf of a visitor.
- User name reference above the search results column to indicate who you are going to book for.
- The Booking Attendance field to inform operational team about upcoming visitors.
- Auto check in toggle for booking on behalf of someone.
- Space information and space guides are now accessible by clicking an icon on the space card.
- Booking start time adjustment according to booking policy.
- Multiple catering orders per one space booking.
- 2025.01
- Alternative space suggestion if no search results
- Need Events space criterion during search
- Marking a space as favourite
- Visitor Type field when adding a visitor
👋 Share your feedback with us about this documentation. Highlight a word or a whole paragraph and click the plus icon that appears. We keep improving this knowledge base based on your comments.
In Flex, you can create a standard booking for your nearest working day, an ad-hoc space booking, a series of bookings with or without any pattern, and add needed services or equipment to your booking where available. For meeting room bookings, you can also choose the capacity and layout to accommodate the special needs you might occasionally have.
About the Advanced Booking page
Flex offers a separate page for bookings that have more conditions than a one-time space booking. The Advanced Booking page in Flex helps you book a recurring meeting or a linked space with a certain layout along with adding services if needed.
Booking a space starts with searching for an appropriate space using available search criteria, then you select one, and then confirm your booking. Additionally, you might need to add more details to the booking if you're booking linked spaces or you might need to select alternative spaces for recurring bookings if not all occurrences have an allocated space.
On the Advanced Booking page in Flex, start by adding as many search criteria as you have to filter out applicable spaces for your booking. After you've found the space that you'd like to book, you can tap the space information icon to view information that might impact your choice:
- The associated booking policy
- Additional space information
- Space guides if available
ℹ️ At this point, you can also add the space to your favourites. As you have the space information popup open, click on the star ⭐ in the upper right corner. This way, if available at the time of your search, your favourite space will be higher up in the search results list next time you search for the same criteria.
System adjustment for booking start time
⚠️ Note that your organisation can set Allowed time range per building that will allow start time adjustments for your bookings to match booking policy requirements. You will see the corresponding notification if the start time of your booking differs from what you searched for. View the difference in time on the example below.

Booking options instructions
One-time booking
You can create here a one-time space booking for a single use, but we recommend creating such bookings with no distraction on the Simple Booking page in Flex. Read more here: Simple booking in Flex.
When creating a single booking, date selection by the system has the following logic:
- If current time is before start time of working day preferences, the date is set for today. Read more about working day preferences here: Settings in Flex
- If current time is after start time of working day preferences, the date is set for the next day.
In any case, you can change the date manually.
Booking for right now (ASAP)
You can book a space for the nearest time. For this:
- Select the As soon as possible option.

- Add duration (To).
- Edit location (Building, Floor, Zone), Space Type if needed, and indicate Capacity if you need a meeting room.
- Click Show more search items to browse other options for the selected space type. Select from what's available, for example: linked spaces, events, AV, catering, hearing aids, resources (presentation aids), or spaces that allow conducting events (the Need Events? toggle).
Note: Equipment and catering are available to book at least 24 hours in advance and are available for meeting room bookings only. Hence, services are not available for ASAP bookings. - Click Search.

- Select a space from the search results in the middle column of the page.
ℹ️ Check the associated booking policy, space information, or space guide on top of the third column.
ℹ️ Here, you can add the space to your favourite spaces. For this, click the star in the top right corner of the space info popup. - Add booking name (mandatory) and a description (optional).
- (optional) Indicate Booking Attendance for the operational team to plan space and visitor management support accordingly.
- (optional) Indicate if you Book for Someone Else: an employee or a visitor.
- EMPLOYEE. You can select your colleague from FAVOURITES or DELEGATED BY – a colleague who delegated you the permission to book on behalf of them.
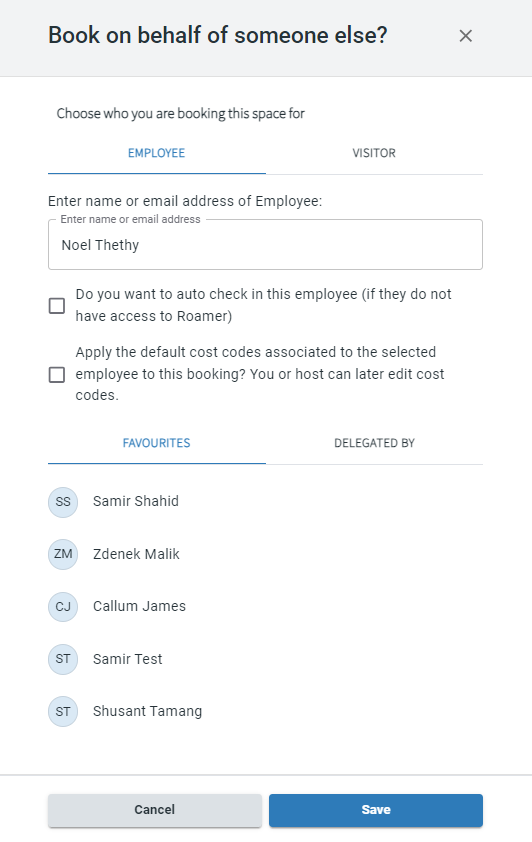
⚠️ Use checkboxes in the popup – right under the name of the employee that you indicated – to make important decisions about the booking you are making for someone else. You can:- Check in this employee automatically into the booking.
- Apply the default cost code of the selected employee.
In this case, your default cost code won't be added to the booking. Only the cost codes that are associated to the selected employee.
- Or a VISITOR. Indicate all details about your visitor and you can check them in to this booking. They will have to check in to the building separately.

- EMPLOYEE. You can select your colleague from FAVOURITES or DELEGATED BY – a colleague who delegated you the permission to book on behalf of them.
- (optional) Set booking(s) to auto check in for [user].
- (optional) Add Attendees if applicable. Mark the ones who are external visitors.
⚠️ You can add up to 250 attendees to the meeting. - (optional) Indicate one or more Cost Codes if your organisation is using them:
- Add cost codes in free text or by selecting them from a list.
- Edit the default ones if you are booking for yourself. Read the Default Cost Codes section in this article: Settings in Flex.
- Check the cost codes of the person that you book for if you selected to use their default cost codes in the previous step.
- Click Confirm booking.
⚠️ Note: There're booking policies enforced for each space within your organisation. They can limit the time for booking start to be, for example, at the exact hour or each half an hour. Because of this, booking for right now may be unsuccessful if, for example, your current time is 9:47. In this case, turn off the As soon as possible toggle and adjust timing for your booking to match booking policy requirements.
Recurring booking
For the recurrent events as regular work or meetings, Flex helps you find and book the appropriate space.
Recurring bookings in Flex are enabled on the user group permission level along with building permissions. Contact your IBSS representative to enable recurring bookings for your building if they are set in booking policies.
Note: Your organisation may restrict the availability of spaces for your recurring booking or set limitation for the roles who are able to create recurring bookings.
To create a series of recurring bookings, do the following:
- Set Who are you booking for first.

- Check if the location is as needed under Where do you want to book?
- Set what kind of space you are planning to book.
- Select the Recurring option under When do you want to book?
- Select the date and time of your first booking in the series. All following bookings will follow the selected pattern.
- Select the Recurrence Pattern: daily, weekly, or monthly. Select other options for your series of bookings depending on the recurrence pattern.
(optional) Click Show more search options if you need services or events. Select from what's available, for example: linked spaces, events, AV, catering, hearing aids, resources (presentation aids), or spaces that allow conducting events (the Need Events? toggle). - Click Search to view the list of spaces that can be booked with this recurrence pattern. You can view search results in list or map view, depending on your preferences set under Settings > Workplace Preferences > SEARCH RESULTS:
- In map view, available spaces that you can book will be highlighted in green and the ones that are not available for any of the occurrence are highlighted in navy colour. Switch between floors using the drop-down below the map.
- In list view, you will see all spaces that are available for at least one occurrence that you're searching for.
- Select a space that fits the most.
ℹ️ Check its associated booking policy, space information, and relevant space guides if available.
ℹ️ Here, you can add the space to your favourite spaces. For this, click the star in the top right corner of the space info popup. - Fill in the Booking details.

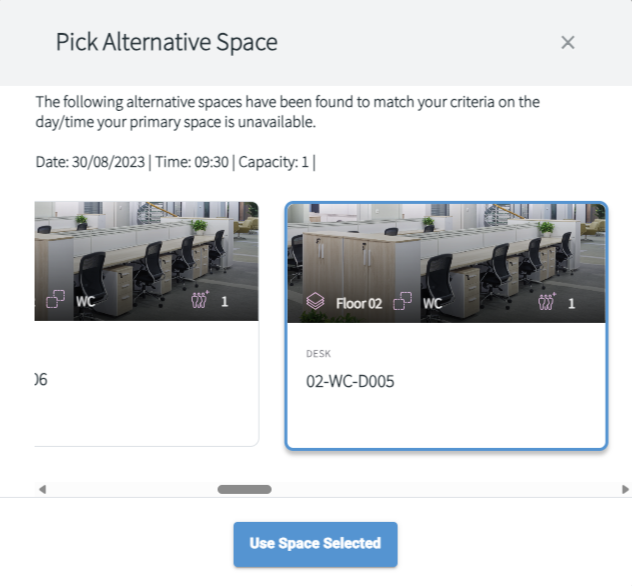
- Add alternative spaces if needed. You may occasionally see that for one or more of your occurrences your ideal space isn't available. Flex allows you to pick an alternative space for those specific occurrences, rather than have to start your search again. In such case, you will see an Alternative button next to the occurrence that needs your attention. To choose an alternative location:
- Click Alternative to open the list of available spaces according to your initial search criteria.
- Select the space that you would like to use and click Use Space Selected.
- (optional) Add Attendees if applicable. Mark the ones who are external visitors.
⚠️ You can add up to 250 attendees to the meeting. - (optional) Indicate one or more Cost Codes if your organisation is using them:
- Add cost codes in free text or by selecting them from a list.
- Edit the default ones if you are booking for yourself. Read the Default Cost Codes section in this article: Settings in Flex.
- Check the cost codes of the person that you book for if you selected to use their default cost codes in the previous step.
- Add alternative spaces if needed. You may occasionally see that for one or more of your occurrences your ideal space isn't available. Flex allows you to pick an alternative space for those specific occurrences, rather than have to start your search again. In such case, you will see an Alternative button next to the occurrence that needs your attention. To choose an alternative location:
- Click Confirm booking to create all bookings for the selected spaces.
- View Your booking summary. From here, you can edit confirmed bookings and will see the rejected ones if any. The ones that failed will be marked in red. The page loads dynamically, and some of the information may load after some time.

Multiple bookings without any pattern
You can book one available space for several dates and times without any recurrence pattern. To find and book a suitable space, do the following:
- Define your search:
- Who do you want to book for.
- Where do you want to book: building, floor, and zone are set from your preferences by default.
- When do you want to book. Select Multiple here.
- Click + to start adding booking dates and times for your series of bookings. Mind the Maximum Booking Horizon that might be set for spaces within your organisation.
- (optional) Click Show more search options if you need to make multiple bookings of linked spaces or need services. Select from what's available, for example: linked spaces, events, AV, catering, hearing aids, resources (presentation aids), or spaces that allow conducting events (the Need Events? toggle).
- Click Search to view spaces that are available on your selected dates and times.
- Select a space from the search results list.
ℹ️ Check its associated booking policy, space information, and relevant space guides if available.
ℹ️ Here, you can add the space to your favourite spaces. For this, click the star in the top right corner of the space info popup.
ℹ️ You can view the available spaces on the map if your organisation has enabled this option for you. - After you've selected the space that you want to book, add details about your booking: name (mandatory), description, user name of the person that you book for, cost code(s) as applicable.
- Click Confirm booking.

View Your booking summary. From here, you can edit confirmed bookings and will see the rejected ones if any. The ones that failed will be marked in red. The page loads dynamically, and some of the information may load after some time.
Linked spaces
Booking linked spaces in Flex
Applies to app version 2023.02 with the following features added in the next releases:
- 2024.01 Default cost codes
- 2024.02 Tags for booking records
- 2024.02 New look of the Advanced Bookings page
👋 Share your feedback with us about this documentation. Highlight a word or a whole paragraph and click the plus icon that appears. We keep improving this knowledge base based on your comments.
For a special meeting you might need a certain large space that is set up with a certain layout of furniture, for example in a square hole, auditorium, or classroom. Your organisation can have adjacent bookable spaces that can be combined into one on request.
⚠️ Linked spaces work with the space type of meeting rooms only.
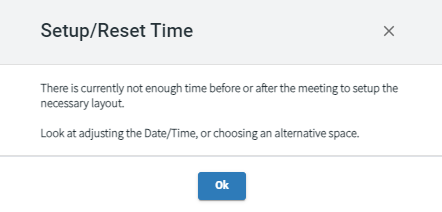
⚠️ Linked spaces require time to set them up for your meeting and time to reset them to their original state. Each organisation defines the needed amount of time for these activities in booking policies. That's why during booking of linked spaces, you will have an additional step meant for validation of available slots before and after your meeting for setup and reset activities in the requested spaces.
You can book linked spaces on the Simple Booking page and on the Advanced Booking page.
Booking linked spaces on the Simple Booking page
To book a linked space when creating a single booking, do the following:
- On the Simple Booking page, click Edit search criteria to start looking for linked spaces.
- Select the needed type of a meeting room for the Space type because only meeting rooms can be linked.
- Turn the Need a linked space? toggle on. The Need layouts? toggle turns on automatically too.
- Click UPDATE to search for linked spaces specifically.
- Select a space.
- On the booking details page, under Linked Spaces, select the combination of spaces that you want to use and select the layout. Save your selection.
Note: Mind that the other space that is linked to the one that you initially selected might not be available at the time of your meeting. In that case, you will receive a corresponding error message and will have to search for other appropriate two spaces that can be linked again. - (optional) Indicate if you Book for Someone Else: an employee or a visitor. For employee, you can select the checkbox to use their default cost codes if they have set any.
- (optional) Add Attendees if applicable.
- Indicate one or more Cost Codes if your organisation is using them:
- Add cost codes in free text or by selecting them from a list.
- Edit the default ones if you are booking for yourself. Read the Default Cost Codes section in this article: Settings in Flex.
- Check the cost codes of the person that you book for if you selected to use their default cost codes in the previous step.
- Click Confirm booking. At this point, as with booking other spaces, you can add equipment, catering, or tags if available for this space.
Booking linked spaces on the Advanced Booking page (preferred method)
To book a linked space for now or later, do the following:
- On the Advanced Booking page in Flex, select all search criteria for you event that requires booking linked spaces.
- Click Show more search options.
- Turn on the Linked Spaces toggle.

- Select a space in the search results column.
Check its booking policy, additional space information, and relevant space guides if available.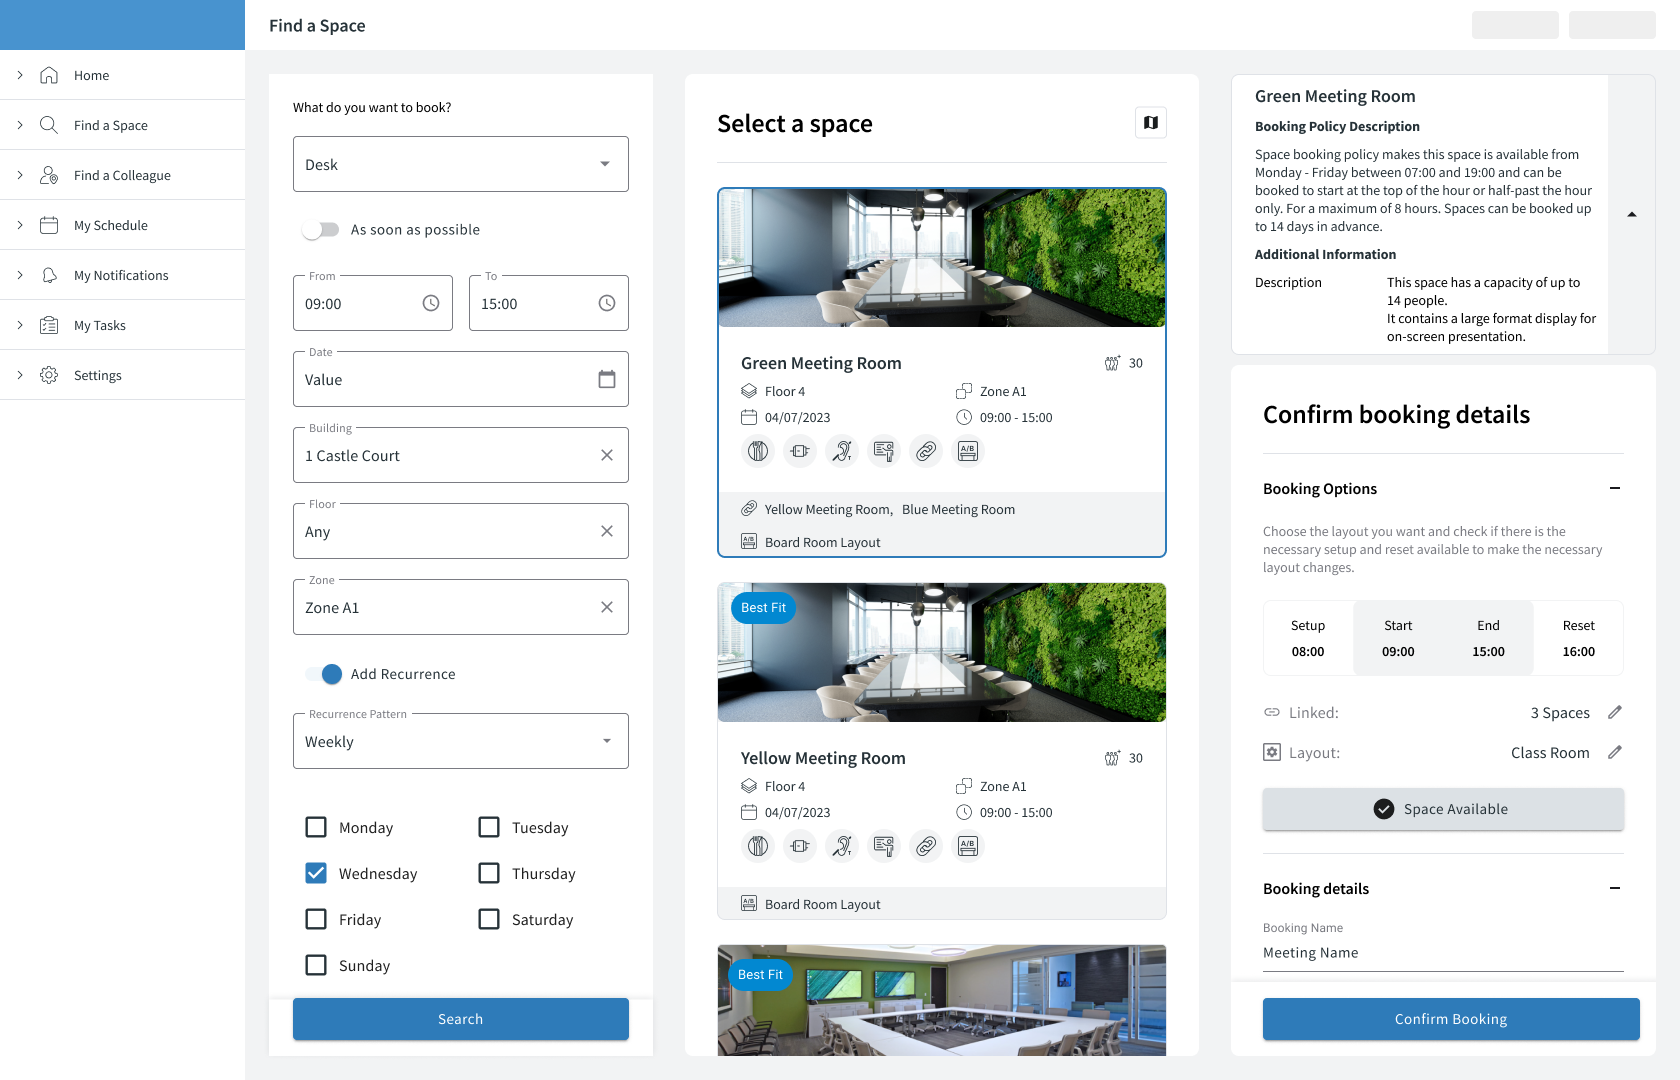
- You will see the booking details in the third column of the page.

Read more about the additional setup and reset slots that are added before and after your booking: Setup and reset slots for linked space bookings. - Click Linked Spaces: to view the options for these spaces. Select the most appropriate layout for your needs.

- Click Save in the popup to move on to check whether there's sufficient setup and reset time to prepare selected linked spaces for your desired time of the meeting.
- Click Check availability to see whether all conditions are met.
- If the space is available for booking, add the booking name and other details including cost codes and other options.

- (optional) Indicate if you Book for Someone Else: an employee or a visitor. For employee, you can select the checkbox to use their default cost codes if they have set any.
- (optional) Add Attendees if applicable.
- (optional) Indicate one or more Cost Codes if your organisation is using them:
- Add cost codes in free text or by selecting them from a list.
- Edit the default ones if you are booking for yourself. Read the Default Cost Codes section in this article: Settings in Flex.
- Check the cost codes of the person that you book for if you selected to use their default cost codes in the previous step.
- If the space is not available, you will see the corresponding message and will return to selecting another space or another layout for your booking.
- Click Confirm booking to save your booking of linked spaces.
Now, you will see your booking on the Schedule page. The team that is responsible for setting up and resetting linked spaces will receive a corresponding notification and will have booked time slots before and after your meeting to set things up and clean it up for you.
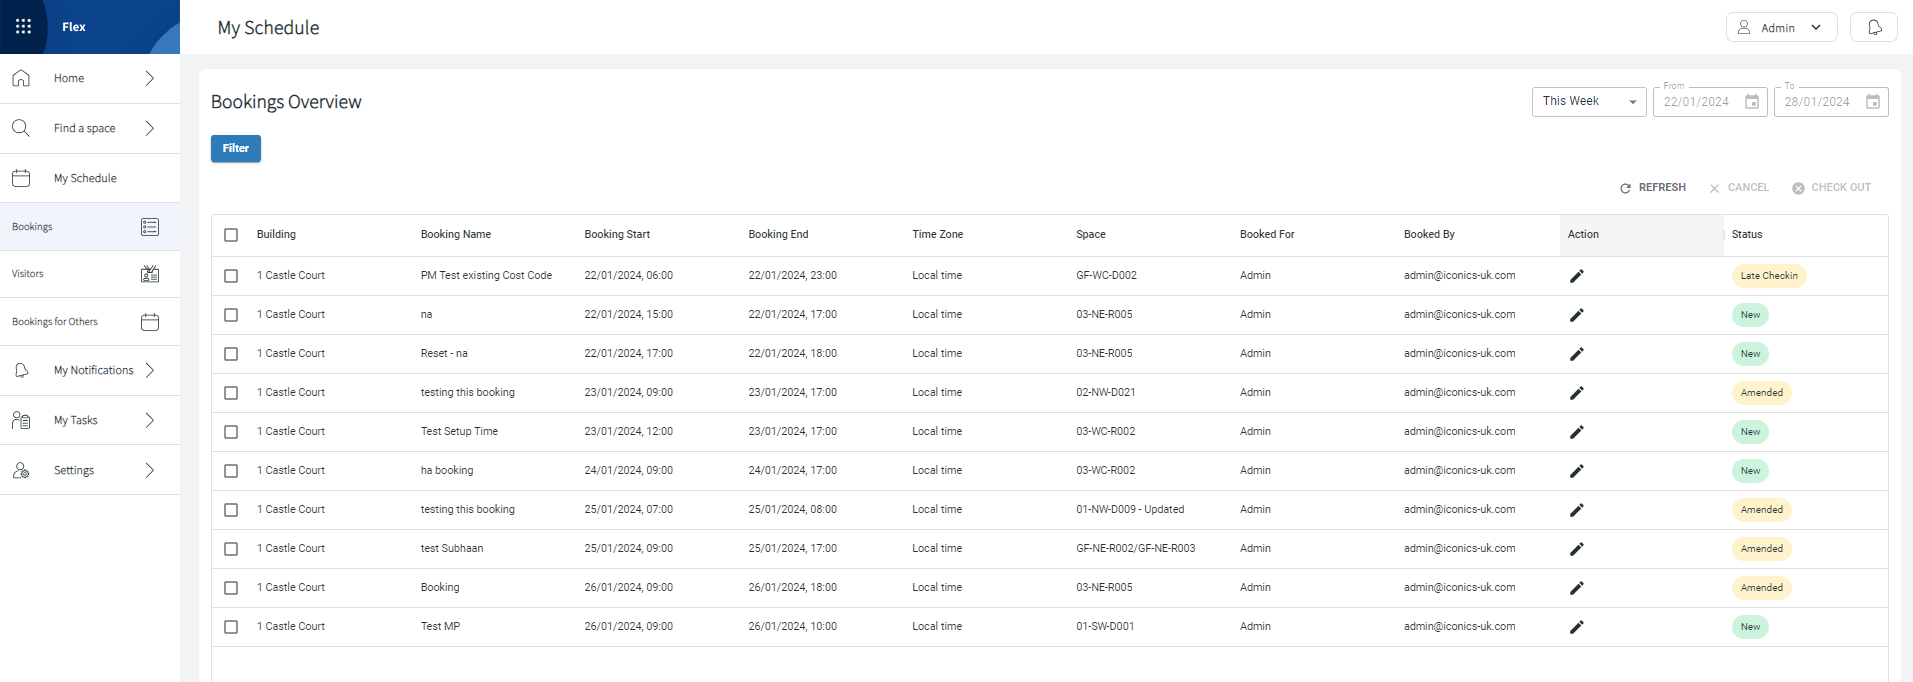
Now, you are all set and can view your booking under Schedule > My Bookings.
Booking approval
Some spaces may have an approval flow enforced by your organisation in the corresponding booking policy. Typically, these spaces are high-value boardrooms or other unusual spaces within your building. After you make a booking of such space, you will see your booking status still as New in green, just like other bookings under Schedule > My Bookings. Meanwhile, the responsible person will make a decision whether to approve or decline your booking. You will receive a corresponding notification about this.
After you've made a booking
You can modify your bookings. Read more about this here: Modifying a booking in Flex.
Checking in
When you have a space booking, make sure to check in before your meeting within the allowed early check-in period that is set by your organisation. Also, mind the automatic checkout of the space if you don't check in.
Note: Checking in to a booking via Flex is security controlled by your organisation. Due to the business policy, it may not be possible to check in to bookings remotely in Flex.
You can check in to your bookings or to bookings made on your behalf. For this:
- On the Schedule > My Bookings page, click the pencil icon next to the upcoming booking that you want to check in.
- Click the Check In button on the left under the space details.
Checking out and cancelling
After your meeting or if you've finished your meeting early, remember to check out of the space to make it available to others.
If you don't need the booking any longer, make sure to cancel it and free up space for someone else. Go to Schedule > My Bookings, select the needed booking, and click CANCEL in the top right corner of the table with your bookings.