

Applies to app version 2023.01 with the following features added in the next releases:
- 2024.01 Default cost codes
- 2024.02 Tags for booking records
- 2024.03:
- Space schedule on the booking editing page
- Booking Attendance
- Multiple catering orders to one space booking
- Moving booking across buildings
- 2025.01 Adding event to a booking
After you have a booking created in Flex, you can edit it in the My Schedule section > Bookings. To find a booking that you want to edit, use the Filter button at the top left of the bookings list to find the space by:
- State
- Person who has booked the space in case it was booked for you by someone else
- Space name
On the Bookings page, you can also cancel a booking or check in or out of your bookings.
Note: Checking in to a booking via Flex is security controlled by your organisation. Due to the business policy, it may not be possible to check in to bookings remotely in Flex.
While editing an existing booking, you have a series of options:
- To confirm or edit your booking name or description
- To confirm or edit your booking date and time
- To change space or location for your booking
- To add or remove internal attendees or visitors
- To add linked spaces or modify furniture layouts
- To add services:
- Equipment (hearing or presentation aids)
- One or more catering orders
- To add tags for improved categorising of your bookings
Read about creating a booking in Flex here:
Edit booking name and description
You can edit the booking name and description. This is how your booking will appear in all IBSS applications, including on tablets with Unity and Inspire kiosks.
Change time
Should you need to change time of your booking complete or extend it, on the booking edit page, you can view the space schedule with other planned bookings for the reference.

Change space or location
You will need the API.Bookings.MoveSpace (with the per building level permission) security right to be able to change booking location.
- Click Edit Your Location Or Space to open the Define your search panel with all space filters for you to choose another appropriate space for your booking.

- Define new search criteria and click Search.
- Select a new space to move your meeting to. You will return to the main booking editing page.
- Click Update Booking when you're done editing it.
Add attendees and/or visitors
When adding additional participants to a meeting room booking, there are two options: internal attendee and an external visitor.
Internal attendees
When adding an internal attendee, start typing the needed name and select them from the dropdown. Confirm your selection by clicking Save.
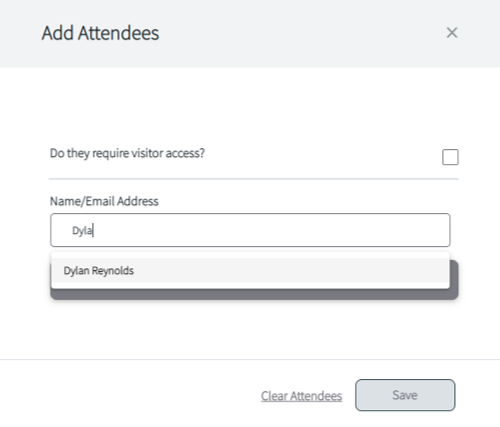
External visitors
Adding an external visitor requires additional information. When you add visitors and create the booking, they will be added into the visitor management system. If your visitors need to be approved according to your organisation settings, they will receive an invitation notification after the approval.

Once you have filled in all visitor's information, click Save, and then click Confirm Booking to finalise your booking. If your organisation has the approval flow switched on for the building or for entire organisation, you will receive approval status notification.
This booking will be synchronised across all applications in the IBSS platform, so it will be available for amendments or cancellation in Flex and Roamer, and available for check-in on tablets with Unity and Inspire applications.
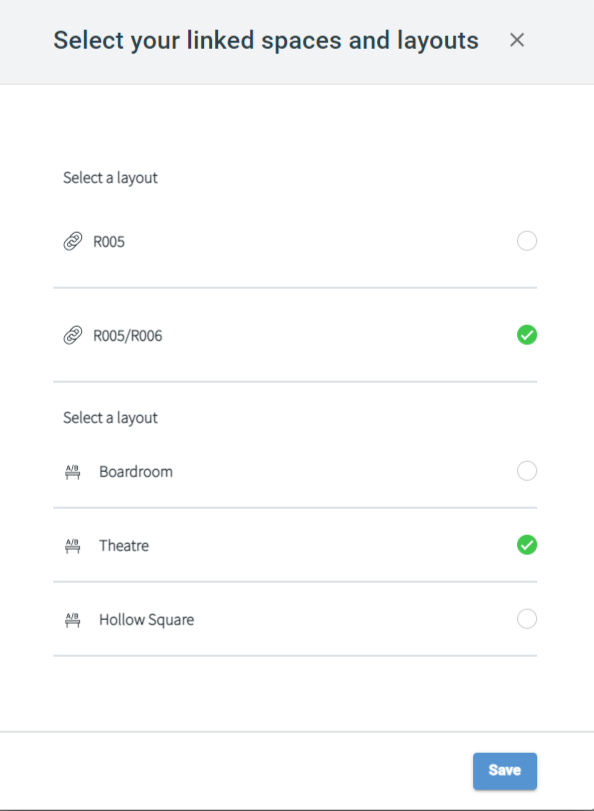
Add linked spaces or modify layouts
Some spaces may have options to link additional spaces or request particular furniture layouts if this is enabled by your organisation. You can access this and request room adjustments by clicking the related sections.
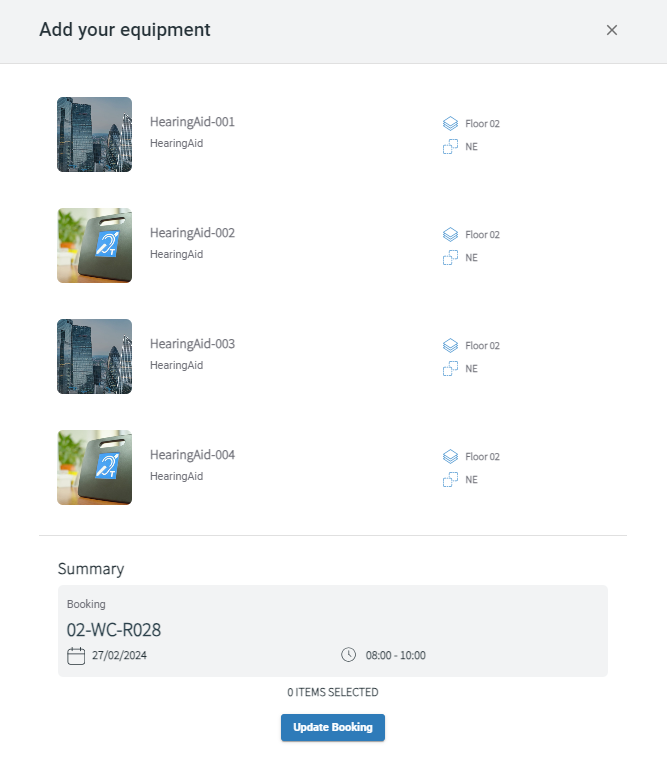
Add equipment
In Flex, you can add services only to a created and confirmed booking of a space that has these services available. Should you require something specific, search for a space that has the needed option available and book it.
Once the booking is created, you will see the available options to order services (equipment or catering) for the room in the booking confirmation popup. Or you can add equipment (hearing aids or resources) when editing a booking.
Upon selecting an option, you can decide what equipment is required and click Update Booking.
Add catering
Ordering catering in Flex
How catering works
-
Organisation level. For their users to be able to order catering to their meeting room bookings, organisations first define the following:
- If the catering feature should be available for the organisation at all and, if yes, to what user roles.
- Whether one or multiple catering orders can be added to space bookings.
- Whether catering orders must be approved by Catering Manager or not.
- How budgeting of catering orders should work, whether cost codes should be used for catering orders.
-
Operational team and kitchen level. This is where the operational team defines:
- What are kitchen operating times and catering items preparation times. This will impact what users can order depending on when they are ordering.
- What are available catering items and their cost, label them with allergens or other dietary restrictions for filtering.
- User level. After all is set up organisation-wide, users with appropriate permissions can add catering orders to their confirmed space bookings. Create a booking for a space that allows catering service to be delivered.
Learn more about aspects that affect what and when you can book here: Catering order cut-off flow.
Adding a catering order to a booking
To be able to add catering orders to the booking, you must book the space that allows booking first. Use the Catering search criteria to view only spaces that allow catering services to be delivered.
After you've booked a space with catering options, do the following:
- Click
- Catering in the booking confirmation popup
- or when modifying the booking (the Edit booking page).
A catering order page opens.

- Review the summary of your booking: room, date, and time. You can edit your boking by clicking the View booking button in the top right corner.
- The Order By field notifies about the cut-off time that is needed for meal preparation or if advance ordering limitations are set. Make sure to finalise your order by this time. If you've made the booking after the cut-off time and try adding a catering order, the message in this field will display: New orders or changes for this booking are now closed.
- Add one or more cost codes and their apportioning in percentage if applicable.
⚠️ Your default cost code(s) will be already added – listed on the right. To remove it, use arrows to move it to the left. Then, add other cost code(s).
Read more about setting your default cost codes here, in the corresponding section: Settings in Flex.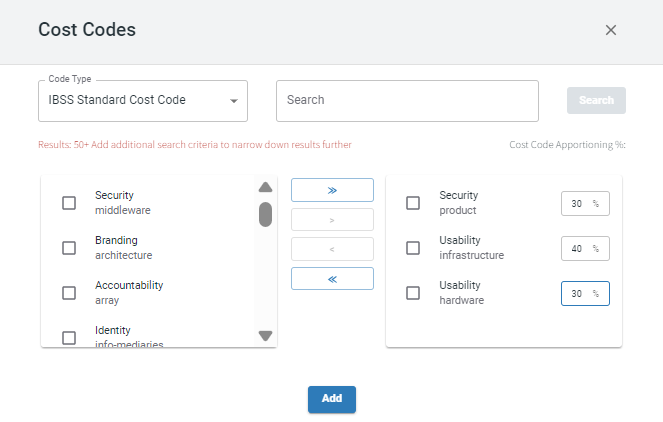
- Select the available menu from the drop-down.
⚠️ There may be several menus available for the space that you have booked. Select one menu to choose items from it. If you select items from one menu, and then switch to another, all previously selected items will be cleared.
- You can filter by allergens for the relevant catering items to be excluded from the menu or filter out food that is, for example, marked as vegan, vegetarian, or kosher.
- View catering items available on the menu in three tabs: BEVERAGES, SNACKS, and FOODS.
⚠️ Mind that catering items have time-bound preparation and delivery times: some items can become unavailable if it's past the cut-off time for item preparation or kitchen operating hours. It means that depending on when in relation to your booking time you are trying to add or modify catering orders, you may see a different set of menu items available.
- Expand the menu item to view its details if you need.
- Edit quantity for menu items.
- Add your allergies to notify the kitchen staff so that they can adjust accordingly.
- Add notes if relevant.
- See the service and clean-up times that are needed to support your order. By default the time set is the start and end time of your booking. You can define different times for delivering catering items and for clean-up.
- Click Save Order.
Your order might need to be approved before it is processed by the kitchen depending on your organisation settings. Once it is approved, you'll receive a confirmation. If you don't need approval, your booking is set up.
Adding multiple catering orders
You can also add multiple catering orders if you need them to be delivered and cleaned at different times during your meeting. For this, use the Add Further Orders button after you've added a catering order.
⚠️ To have this option available, admin of your organisation must grant the API.Catering.MultipleOrders permission to your role.
To add another catering order:
- Use the Add Further Orders button on the confirmation popup.

- Or click Add New Order on the catering order editing page.

Automatic catering orders
🚩 Available in app version 2025.02
Once you book a space that is equipped with automated catering orders and the duration of your booking is at least as the minimal duration set for such catering orders, you will see the corresponding order on the booking record page or when trying to add more catering orders.

From here, you can:
- Turn the Disable Catering Order toggle on if you don't want this set of catering items to be delivered.
- Click Cancel Order altogether.
- Depending on the Order By time as shown in the Related Space Booking card, you may be able to add further catering orders. In the image above, current time is past the cut-off time and, as the message says, no more orders are allowed for this booking.
Automated catering order is calculated based on the number of attendees that you added to your booking. The number of items included will also change if you change the number of attendees.
Add ticketed event
Ticketed Events in Flex
🚩 Available for app version 2025.01 onwards.
Event Management is available in IBSS apps to assist organisations in planning, advertising, conducting, and tracking of social events.
In Flex, users who have the FLEX.Events.View permission can:
- Create an event to invite other people to attend
- Participate in the event
In OneLens, users will require additional permission to accomplish the following:
- Edit event details
- Manage event attendees
Read more about managing events in OneLens 360 here: Ticketed events in OneLens 360
Creating an event
To create an event, do this:
- Book an appropriate meeting room space that allows conducting of events. Use the new Need Events toggle:
- Under Additional criteria on the Simple Booking page.
- Under Show more search options on the Advanced Booking page.
- ⚠️ Note that the system won't check if the space capacity and event capacity are aligned. Remember to book a space that allows enough people to attend your event.
- When the space booking is confirmed:
- Click EVENT in the confirmation popup.
- Open the booking for editing and click Ticketed Event there.
- Event creation page opens. Fill in the presented fields.
- Save as draft or publish the event.
- Select if you'd like to create an announcement about the event to invite your colleagues.
⚠️ You'll need appropriate OneLens 360 permissions to create an announcement. Read more about creating an announcement here: Announcements in OneLens 360
Participating in the event
A selection of upcoming events in your organisation is presented to you in several places:
- On your Flex home page under Events section

- On the separate Events page in Flex
- Additionally, an announcement can be created to notify you about an event, and you'll see those announcements:
- In the News section on Flex home page
- On the My Notifications page under Building Announcements
Click the event's ribbon to view its details and check if there are available places if you're willing to participate:
- If the registration is open, you will see the BOOK FOR YOURSELF button.

- If the registration is closed but has a waitlist, you can use the Join Waitlist button. The system will automatically add you to the participants list if a place becomes available.
Add tags
- Immediately after making booking you'll have the option on the confirmation popup. Click TAGS opens your booking for editing.


👋 Share your feedback with us about this documentation. Use the Give feedback about this article link at the bottom of this page. We keep improving this knowledge base based on your comments.